How to install a new printer fuser unit?
Installing a printer fuser unit is a crucial task that requires careful attention to detail and adherence to specific instructions.
The fuser unit plays a vital role in printing by applying heat and pressure to bond toner or ink onto the paper, resulting in a permanent image.
Over time, the fuser unit may wear out or become damaged, necessitating its replacement.
To begin the installation process, it is essential to ensure the printer is turned off and unplugged from the power source.
This step is crucial for safety reasons and to prevent electrical mishaps during installation. Once the printer is powered down, locate the access door or panel that provides access to the fuser unit.
The exact location of the access point may vary depending on the printer model, so it is highly recommended to consult the user manual for specific instructions.
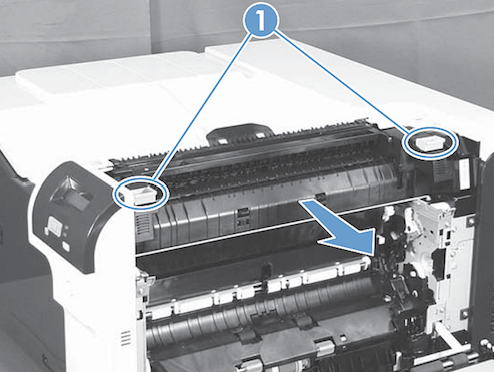
You can see the fuser unit once the access door or panel is open. It is typically a large metal or plastic assembly that can be easily identified.
Take a moment to familiarize yourself with the fuser unit's components and position within the printer.
Before proceeding further, it is essential to disconnect any cables or connectors attached to the fuser unit. These cables may include power, data, or other connectors facilitating the fuser unit's operation.
Carefully detach these cables, taking note of their positions and connections for reassembly later. It is advisable to use gentle force and avoid pulling on the cables directly to prevent damage.
Once the cables are disconnected, you can remove the old fuser unit. Depending on the printer model, this may involve removing screws or releasing latches that secure the fuser unit.
It is crucial to follow the instructions in the user manual to ensure a proper and safe removal process. Take your time and exercise caution to avoid causing any damage to the printer or other components.
Once the old fuser unit is successfully detached, it is time to install the new one. Take the new fuser unit and align it properly in the printer, ensuring it fits securely. The user manual will provide specific instructions on positioning and securing the new fuser unit in your particular printer model. It is essential to follow these instructions precisely to ensure proper functionality and avoid potential issues.
Depending on the printer model, you may need to reattach screws or latches to hold the new fuser unit in place.
Ensure that all screws are tightened securely but not overly tightened, as this can cause damage to the printer or the fuser unit itself. If latches are used, make sure they are engaged properly to ensure a secure fit.
After securing the new fuser unit, it is time to reconnect the cables and connectors that were detached earlier.
Care to align the connectors correctly and ensure they are properly seated and secured. Improperly connected cables can lead to connectivity issues or malfunctioning of the fuser unit.
Once all cables and connectors are reattached, it is time to close the printer's access door or panel.
Ensure it is closed securely to prevent dust or debris from entering the printer and potentially causing damage.
With the physical installation complete, you can plug in the printer and turn it on. It is advisable to run a test print to verify that the fuser unit is installed correctly and properly.
This test print will help identify any potential issues or errors that may have occurred during the installation process.
If the test print is successful and the printer operates as expected, the fuser unit installation was successful.
In conclusion, installing a printer fuser unit requires careful attention to detail and adherence to specific instructions.
Following the manufacturer's guidelines and consulting the user manual can ensure a successful and safe installation process.
Proper installation of the fuser unit is essential for maintaining the printer's functionality and ensuring high-quality prints.